
# How to Geotag Camera Photos Without GPS Using GeoFix and GraphicConverter
*Does your camera save photos without location information? Discover how to use GeoFix on iPhone and GraphicConverter on Mac to add GPS coordinates to your images, without a Bluetooth connection and using a workflow verified through a real\-world test\.*
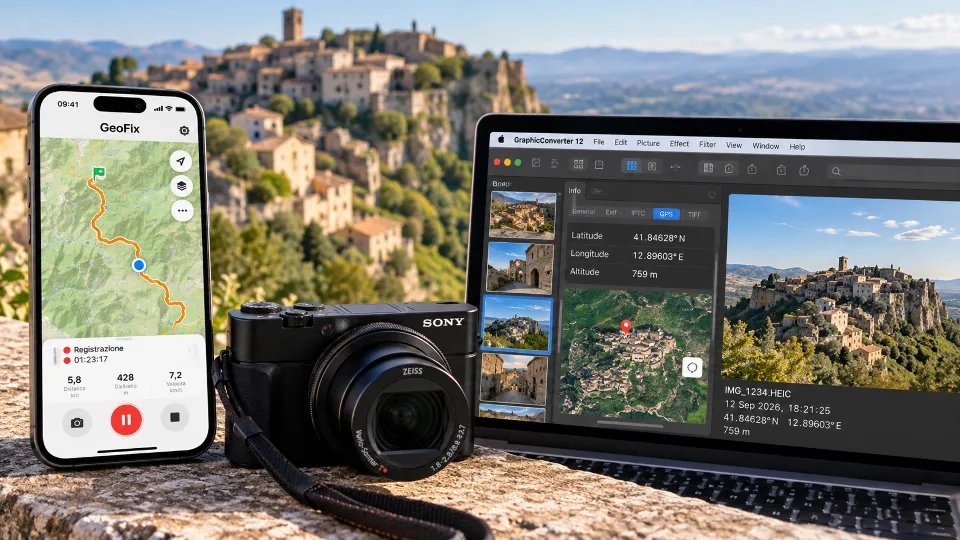
A Photograph Captures a Moment, but Not Always the Location
Imagine spending a day photographing a village, a mountain landscape or a destination you're visiting for the first time.
You take your camera with you, stop at the most interesting places, take photographs and continue exploring, when you get home, you transfer the images to your computer and start organizing them.
Photographs preserve valuable information, such as the shooting date, time, camera model and camera settings, but something is missing...
Where exactly was that photograph taken?
Many digital cameras don't have a built-in GPS receiver, or don't automatically record geographic coordinates in their images, this means that, even when you know exactly when a photograph was taken, you might not have a precise reference for its location.
The good news is that you don't necessarily need a GPS-enabled camera to add this information to your photographs, the solution? Record your route with GeoFix and geotag your photographs afterward.
The principle is simple, while you use your camera to take photographs, your iPhone records your GPS route, with GeoFix you can save a track of your movements and export it in GPX format.
A GPX file can contain a sequence of geographic points, each associated with its coordinates and a recorded time, photographs, on the other hand, normally preserve the shooting date and time in their metadata.
GraphicConverter, an application developed by Lemke Software, can use this information to match photographs with positions recorded along the GPS track. The matching process works by comparing timestamps, not through direct communication between the camera and smartphone, you don't need to connect your camera to your iPhone via Bluetooth.
GeoFix records and exports the GPS track, GraphicConverter uses the file to add geographic information to the photographs.
You only need a few tools to follow this procedure.
- An iPhone with GeoFix installed, used to record your GPS route.
- A digital camera that correctly stores the shooting date and time.
- A Mac to which you can transfer your photographs.
- GraphicConverter, the software that allows you to associate GPS data with images.
- The GPX file exported from GeoFix after recording your route.
This procedure is useful for photographers using Sony, Canon, Nikon or other cameras without built-in GPS, provided their image files contain usable timestamps and are supported by the software.
Your camera and iPhone don't need to be connected to each other, however, it's essential that their clocks are set correctly.
Recording a GPS Track with GeoFix
Before you start taking photographs, open GeoFix on your iPhone and start recording a GPS track.
It's preferable to begin a few minutes before your first photograph, allowing your device to acquire its position and start recording track points.
During your outing you can continue using your camera normally, while GeoFix saves the positions detected by your iPhone.
For useful results it's important to keep the recording active while moving and make sure the device can adequately receive satellite signals.
When you've finished, stop and save the recording, then use GeoFix's GPX export feature to obtain your route file.
Transfer the GPX file to your Mac along with the photographs you want to geotag.
The track contains the information needed to reconstruct where your iPhone was at different times during the recording.
Accuracy depends on GPS signal quality and the track points actually recorded.
Importing the GPX File into GraphicConverter
Once you've transferred the files to your Mac, you can begin assigning GPS coordinates.
Before modifying your original photographs, it's advisable to work with copies, especially during your first attempt.
Open GraphicConverter and use the application's Browser to locate the folder containing your images.
Select the photographs you want to geotag and access GraphicConverter's function for assigning GPS positions using a GPX track.
Import the file exported from GeoFix and check the time and time zone settings.
GraphicConverter uses the timestamps in the photographs and GPS track to identify the corresponding position.
After applying the operation, verify that the coordinates have actually been added to the image metadata.
Command names and option layouts may vary between GraphicConverter versions, so it's advisable to consult the manufacturer's documentation as well.
Pay Attention to Timestamps, They're the Key to Geotagging
The most important aspect of the entire procedure is the time correspondence between your camera and GPS.
Imagine taking a photograph at 3:30 PM, while the GPX file contains points recorded in UTC, Coordinated Universal Time.
If your camera uses Italian local time, the two timestamps won't necessarily be represented in the same way.
During standard time, Italy is one hour ahead of UTC, while during daylight saving time it's two hours ahead.
A photograph taken at 6:21 PM in Italy during daylight saving time therefore corresponds to 4:21 PM UTC.
GraphicConverter needs to interpret this difference correctly to identify the track point associated with the photograph.
There's another factor to consider.
Your camera's clock might be ahead of or behind your iPhone's clock.
Even a difference of a few minutes, especially while moving, can result in a position being assigned that differs from the actual shooting location.
Before a photography outing it's therefore advisable to check that your camera's date and time are correct, verify the time zone and, whenever possible, synchronize the clocks.
The frequency of recorded GPS points also affects the result, because significant movement may occur between consecutive position measurements.
An accurate GPS track combined with an incorrect camera timestamp can produce inaccurate geotagging.
Our Real-World Test in Castel San Pietro Romano
To verify this procedure in practice we used a route recorded with GeoFix in Castel San Pietro Romano, in the Lazio region of Italy, on September 12, 2026.
The exported file, named Castel San Pietro Romano - percorso.gpx, was analyzed before proceeding with GraphicConverter.
The track used GPX 1.1 format and contained 245 GPS points.
Every point included geographic coordinates, elevation and a UTC timestamp.
The recording covered the period from 16:00:53 to 16:54:24 UTC.
For the test we selected a HEIC photograph taken with an iPhone on September 12, 2026, at 6:21:25 PM Italian local time.
We prepared a copy of the photograph by removing its existing GPS coordinates, while preserving the original shooting date and time.
This allowed us to verify whether GraphicConverter could actually add location information using only the photograph's timestamp and the GPS track exported from GeoFix.
The photograph was imported into GraphicConverter, then the GPX file was used to assign its geographic position.
At the end of the operation, the application displayed the message:
«The GPS position was set in 1 of 1 files».
We then checked the photograph's metadata.
The result was as follows:
● Latitude: 41.84628° N.
● Longitude: 12.89603° E.
● Altitude: 759 meters.
The photograph's original date and time remained unchanged.
Finally, we displayed the position on a map, confirming that geographic information had been associated with the image.
The test was successful, demonstrating the compatibility of the GeoFix GPX → GraphicConverter → geotagged photograph workflow.
An important clarification, the test used a HEIC photograph originally taken with an iPhone, not a file produced by a Sony, Canon or Nikon camera.
The test therefore confirms that the procedure works with the material used, while compatibility with other photographic formats should be checked according to the camera and GraphicConverter version.
How to Verify That Your Photographs Have Been Geotagged
After applying the GPX track, don't rely solely on the application's confirmation message.
Open the photograph's information in GraphicConverter and check that GPS data is present.
In particular, check latitude and longitude, along with elevation if available.
The coordinates are normally stored in the image metadata, through GPS information associated with the file.
When supported by the image format and application, you can also display the position on a map.
This check is useful for identifying possible errors caused by time zones, unsynchronized clocks or GPS track inaccuracies.
If a photograph appears in a different location than expected, first check the correspondence between its shooting time and the GPX timestamps.
Does GeoFix Require a Subscription?
GeoFix offers a free basic version and additional features through GeoFix Premium.
GPX track export is listed among the Premium features, so it's important to check the available options in the app before using this procedure.
GeoFix Premium also offers a Lifetime purchase option, designed for people who prefer a one-time purchase rather than a recurring subscription.
Commercial terms and the availability of purchase options should be checked directly in the App Store.
GraphicConverter is an independent commercial application developed by Lemke Software, which also offers a trial under the manufacturer's conditions.
It isn't a GeoFix product and no commercial relationship between the two developers is required to use compatible GPX files.
A GPS Track Can Give Your Photographs a Location
A photograph preserves a moment, but adding geographic coordinates means you can also remember where that moment took place.
This can be useful for organizing a photo archive, reconstructing a journey, cataloging nature photography or finding the exact location where you captured an image.
Our test demonstrates that a GPX track exported from GeoFix can be used with GraphicConverter to assign a geographic position to a photograph afterward.
Your camera doesn't need to communicate directly with your iPhone, because the connection between photographs and the recorded route is established through timestamps.
It's an interesting option for photographers who want to keep using their existing equipment while adding GPS information later.
Final accuracy always depends on GPS track quality, correct clock synchronization and software support for the files involved.
Because a photograph tells the story of what you saw, but a coordinate can help you remember where you were.
Discover GeoFix GPS
Record your routes with iPhone, export GPX tracks and use them with compatible tools to preserve the geographic information associated with your experiences.
Discover GeoFix at geofixgps.com
To learn more about GraphicConverter, visit the official Lemke Software website and consult the GraphicConverter 12 documentation.
GeoFix, wherever you go.